Target Display Mode on a 2017, 2019 or 2020 iMac
If you've pressed ⌘F2 on your 5K iMac and nothing happened, you haven't missed a setting. No Retina 5K iMac ever had Target Display Mode. This page explains what actually happened to the feature, and then gets practical: there is a solution for the machine you have, and it takes one cable. TL;DR: with the new app DisplayBridge, your 5K iMac from 2017 to 2020 becomes a 5K monitor for another Mac.
First, check which iMac you have: Apple menu → About This Mac. If it says 2015 or later, or "Retina 5K" or "Retina 4K" anywhere, Target Display Mode was never there and nothing will make it appear — skip straight to what works today. If it's a 2011–2014 model, the mode is real but needs the iMac on High Sierra or earlier and the other Mac on Catalina or earlier, which in practice means two old machines; DisplayBridge can't help there either, because it needs macOS 13 on both Macs and no iMac before 2017 can run it.
What Target Display Mode actually was
For about five years, some iMacs could double as a plain monitor. You plugged another computer into the iMac's Mini DisplayPort or Thunderbolt port, pressed ⌘F2 on the iMac's keyboard, and the big screen simply showed the other machine's picture. It didn't care what that machine was — a MacBook, a Windows PC, a games console with the right adapter — because the iMac behaved like any other display with a video input.
Apple's list of models that could do this is short, and it ends in 2014:
- iMac (27-inch, Late 2009) and iMac (27-inch, Mid 2010) — over Mini DisplayPort
- iMac (Mid 2011) through iMac (Mid 2014), 21.5- and 27-inch — over Thunderbolt
Even on those machines it faded away, because of two software limits: the iMac acting as the display had to run macOS High Sierra (10.13) or earlier, and the computer feeding it macOS Catalina (10.15) or earlier. Once Macs moved past Catalina in 2019, nothing broke overnight — the feature just quietly stopped being reachable.
Why your 5K iMac never had it
The Retina 5K iMac arrived in late 2014 with a 5120 × 2880 panel, and that panel is the whole story. At the time, no single external video input could carry that many pixels at 60 Hz — DisplayPort 1.2 runs out of bandwidth at roughly 4K60. So Apple drove the panel internally with a custom timing controller, and that design simply has no path for a signal coming from outside. The feature was dropped from the 5K line on day one, and it never came back: not on the 2017, 2019 or 2020 iMac, not on the iMac Pro, and not on the 4K 21.5-inch models from 2015 onward either.
So there's no hidden setting, no Terminal command and no older macOS that brings it back — it was never a software question.
Three things that work today
A 2017–2020 5K iMac is still one of the best screens Apple has ever shipped: 5K, wide colour, 500 nits, and a panel that most monitors under a thousand dollars still can't match. There are three honest ways to put another Mac's picture on it, and they suit different people.
1. AirPlay to Mac — free and wireless, but it's a video stream
Since macOS Monterey, a Mac can receive AirPlay from another Mac, an iPhone or an iPad, and that includes using the iMac as an extended display. The catch is which iMacs can receive: Apple requires a 2019 iMac or newer, or an iMac Pro. The 2017 iMac can send AirPlay but can't receive it, so for that model this route is closed. My AirPlay Mac to Mac guide shows the setup step by step.
Where AirPlay works, it's genuinely useful: no cable, no app to install, and it costs nothing. It's the right choice for showing a presentation, watching something on the bigger screen, or mirroring an iPhone. What it isn't is a monitor replacement. The picture travels as compressed video over Wi-Fi, so AirPlay has a noticeably higher delay and a lower, softer resolution than DisplayBridge: text isn't pixel-sharp, the panel never runs at its native 5K, and the lag between moving the mouse and seeing it move is long enough to be tiring after an hour of real work.
2. DisplayBridge — one cable, and the iMac is a real 5K display at 60 Hz
This is what this site is about, so here's the plain version of what it does. You install DisplayBridge on both Macs — it's one app, the same download for both sides. You connect the two with a Thunderbolt cable. On the Mac you actually work on, you click Connect, and a second or two later the iMac lights up as a second display of that Mac, the same way an external monitor would. Drag windows over, arrange it in System Settings, and get on with your day. If you'd rather watch than read, the six-minute setup video on YouTube walks through it on my own iMac and MacBook: which cable, the install on both Macs, the two permissions, Connect, and arranging the screens.
The picture is uncompressed, full 5K at 60 Hz — every pixel of the panel is driven, nothing is scaled or softened — and the delay is around 20 to 40 milliseconds, which is in the range of an ordinary external monitor for everything except competitive gaming. The iMac stays an iMac: end the session and it's your computer again with nothing changed.
What you need, concretely:
- Two Macs on macOS 13 Ventura or later. The iMac that shows the picture never needs a license, so trying it on an old machine costs nothing.
- A Thunderbolt 3 or 4 port on both, which every 5K iMac from 2017 onward has, and every MacBook since 2016. The 2015 5K iMac has Thunderbolt 2 and isn't supported yet.
- One Thunderbolt 3, Thunderbolt 4 or USB4 cable. This is the one thing people get wrong: a USB-C charging cable looks identical and won't work. Look for the lightning-bolt symbol on the plug, or for "40 Gb/s" on the packaging. A one-metre cable from Amazon Basics, Cable Matters or Anker runs about 10 to 25 dollars; Apple's own is around 70.
- Two permissions on the first run — Local Network on both Macs, Screen Recording on the one you work on — which macOS asks for by itself. The setup guide walks through both step by step.
And the honest limitation: it only works between Macs. A Windows PC or a console can't use it, because the picture doesn't travel as a video signal but as data between two computers that are both running the app.
If that fits, the fastest way to find out is to try it: the download is a free, fully working 7-day trial with no account, and with the cable in hand you'll know within ten minutes whether it does what you need.
3. A conversion board — real hardware, and a one-way door
There's a small industry around turning old iMacs into monitors. The kits replace the iMac's logic board with a driver board that gives the 5K panel ordinary DisplayPort and HDMI inputs. In other words, they bring back exactly what Target Display Mode offered — any source at all, PCs and consoles included — with the panel driven natively and no delay to speak of.
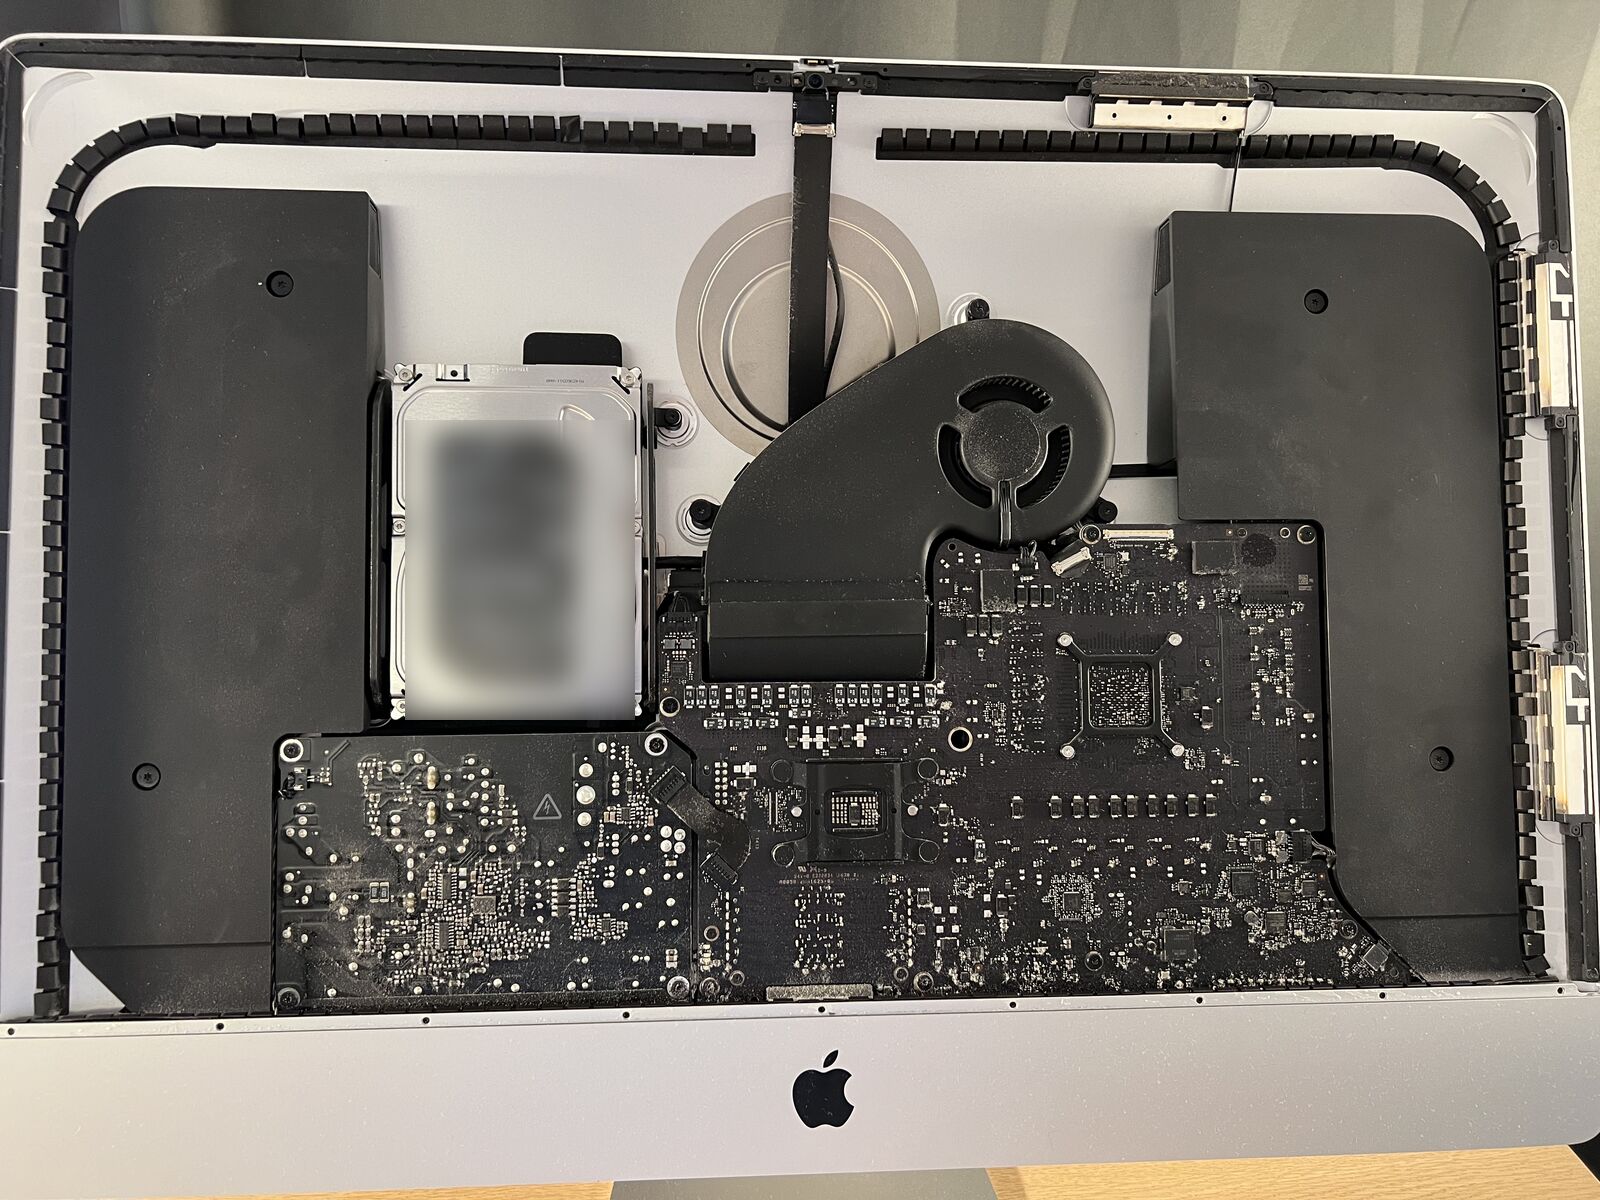
The real price is the iMac itself — it stops being a computer. In money and time, having done this conversion on a 5K iMac myself, here's what it involves. The board, with the power adapter it needs, costs about 110 to 140 dollars. On top of that you need a small iFixit toolkit (around 30 dollars) for the screws, the iMac opening wheel — the "pizza cutter" that slices through the adhesive holding the glass to the frame — and a set of new adhesive strips to close it up again, because the old ones don't survive the opening. Then you take out the logic board, fit the new one, and seal the glass. Budget roughly two hours if you're reasonably handy. From then on the iMac is a monitor and nothing else — there's no putting the computer back without buying another logic board. I've written the whole conversion up — which board fits, the steps, what it really costs — in conversion kit vs. software.
AirPlay vs. DisplayBridge, side by side
If your iMac is a 2019 or 2020 model (or an iMac Pro), you have two software options and the choice is really between these two. The conversion board is a different kind of decision, so it's left out here.
| AirPlay to Mac | DisplayBridge | |
|---|---|---|
| Delay | Noticeable — fine for video and slides, tiring for mouse-and-keyboard work | 20–40 ms, like an ordinary external monitor |
| Picture quality | Compressed video; text slightly soft, colours shifted | Uncompressed; pixel-identical to a wired display |
| Resolution | Scaled to a Wi-Fi-friendly size, not the panel's 5K | Full 5120 × 2880 at 60 Hz |
| Which iMac can receive | iMac 2019 or newer, iMac Pro | Any 5K iMac from 2017, and the iMac Pro |
| macOS | Monterey or later on both Macs | Ventura (13) or later on both Macs |
| Cable | None — Wi-Fi or peer-to-peer wireless | One Thunderbolt 3/4 or USB4 cable, about 10–70 dollars |
| Cost | Free, built into macOS | 29 dollars once, 7-day free trial; the iMac side never needs a license |
| iMac stays a computer | Yes | Yes |
| Works with a Windows PC | No | No |
Which one is for you, in one sentence each. AirPlay if it's occasional, the iMac is a 2019 or newer, and wireless matters more than sharpness. DisplayBridge if the other machine is a Mac and you want the iMac to work like a proper 5K monitor while staying a Mac. A conversion board if the source is a PC or console and you've already decided the iMac's days as a computer are over.
Questions about this
Does the 2019 iMac support Target Display Mode?
No. The last iMacs with Target Display Mode were the mid-2014 models. The Retina 5K iMac, introduced in late 2014, never supported it — not the 2015, 2017, 2019 or 2020 model, and not the iMac Pro.
Can I get Target Display Mode back by installing an older macOS?
Not on a 5K iMac. The mode was a hardware feature of the 2009–2014 display path; the operating system only exposed it. Downgrading a 2017–2020 iMac changes nothing, and those machines can't run anything older than the macOS they shipped with anyway.
Why did Apple remove Target Display Mode?
Apple never said. The usual explanation is the switch to the 5K panel in 2014: a single DisplayPort 1.2 input can't carry 5120 × 2880 at 60 Hz, and the iMac drives its panel internally with two streams. Supporting an external input would have meant extra hardware that Apple chose not to add.
Is the ⌘F2 shortcut still used for anything?
On the iMacs that had the mode, ⌘F2 toggled it. On every later iMac the shortcut does nothing related to displays. If a guide tells you to press it on a 2017 or newer model, that guide was written for the older machines.
Which option keeps the iMac usable as a computer?
AirPlay and DisplayBridge both do — they're software, and the iMac is back to being an iMac the moment you stop. A conversion board removes the logic board and turns the chassis into a monitor for good.