5K iMac as a monitor: conversion kit vs. software
There are two ways to use a 27-inch 5K iMac as a monitor for another computer.
The hardware solution: you open the iMac, remove its logic board and install a driver board kit that gives the display its own video inputs.
The software solution: you leave the iMac closed and install an app.
I have done both. I converted a 5K iMac myself with a driver board kit from eBay, and I develop the software solution, DisplayBridge. This page compares the two on cost, time and risk, and then explains each one in detail. In short: if your iMac is from 2017 or later and you want to connect a Mac to it, the hardware conversion is not worth it. If you want to connect a Windows PC or a game console, or if your iMac is from 2014 or 2015, the conversion kit is the right choice.
Comparison: hardware vs. software solution
Green: the better option in that row · Red: the worse option · No color: no noticeable difference
| DisplayBridge (software) | Conversion kit (hardware) | |
|---|---|---|
| What you buy | Thunderbolt cable: from about $10 DisplayBridge license: $29, paid once |
Driver board with 24 V power adapter: $111 on sale, normally $141 iFixit screwdriver kit: $29.95 iFixit iMac opening wheel: $7.99 Adhesive strips to glue the glass back on: $24.99 |
| Total cost | About $40, or $29 if you already have a Thunderbolt cable | About $175 to $205 |
| Time needed | About 5 minutes to install the app on both Macs, connect the cable and click Connect | More than 2 hours of work. Before that, the iMac should stay unplugged for a day so the power supply can discharge, and the board takes two weeks or more to arrive from China |
| Risk of damage | No risk. It is software, so the iMac stays closed | The glass panel can crack when you lift it out of the case, the display cables are fragile, and the power supply can still hold a dangerous electrical charge |
| Reliability over time | The iMac keeps running on its original Apple hardware | Not known. The board comes from an unknown manufacturer, it gets quite hot in my experience, and there is no proper mount to hold it in place |
| Sound | Included. The Mac's sound plays through the iMac's speakers, over the same cable | To use the iMac's speakers, you need an extra adapter, and these adapters are usually not cheap |
| Trying it before you pay | Yes: a free 7-day trial with all features, no account needed | No. You only find out whether it works after you have ordered the board, waited for it and opened the iMac. Returning the board means shipping it back to China at your own cost |
| Devices that can use the iMac as a screen | Only Macs with macOS 13 Ventura or later and Thunderbolt 3 or 4. Windows PCs, iPads and game consoles can't use it | Any device with a video output: Windows PCs, game consoles and Macs, connected by DisplayPort, USB-C or HDMI |
| Supported iMacs | 27-inch 5K iMacs from 2017, 2019 and 2020, and the iMac Pro | All 27-inch 5K iMacs from 2014 to 2020, as long as the board matches your display panel |
| Image quality and delay | Full 5K resolution at 60 Hz, uncompressed. The delay is roughly 10 milliseconds longer than with a directly connected monitor, which is unnoticeable in everyday use | Full 5K resolution at 60 Hz over DisplayPort or USB-C, with the delay of a normal monitor. Over HDMI, 4K at most |
| Can the iMac still be used as a computer? | Yes. When you disconnect, the iMac works as a normal Mac again | No. The logic board is removed, so from then on the iMac can only be used as a monitor |
Prices checked on 11 October 2026 in iFixit's US store and on the eBay listing where I bought my board (shipped from Shenzhen, China). The board price changes often; on that day it was on sale.
The software solution: how DisplayBridge works
DisplayBridge is a Mac app that lets you use one Mac as an external display for another Mac, connected with a Thunderbolt cable. You install the same app on both Macs: on the iMac, and on the Mac you work on. Then you connect the two Macs with a Thunderbolt cable and click Connect. A few seconds later, the iMac shows up in System Settings as a second display of your Mac. You can then use it like any external monitor: move windows to it, place it to the left or right of your other screen, or make it your main display. The video below is a recording without cuts:
The image is sent as data over the Thunderbolt cable, not as a video signal. It is uncompressed, in the full 5K resolution at 60 Hz, and the delay is only roughly 10 milliseconds longer than with a directly connected monitor, which is unnoticeable in everyday use. Sound is sent over the same cable, so the Mac's audio plays through the iMac's speakers. You can also keep the sound on your own speakers, or play it on both.
The main difference from the hardware conversion is that the iMac is not modified at all. You don't need tools, adhesive strips or parts from China. When you click Disconnect, the iMac works as a normal Mac again, including its camera and speakers, and it keeps its resale value. What you need:
- A 27-inch 5K iMac from 2017 or later, or an iMac Pro, and a second Mac to connect to it, for example a MacBook, a Mac mini or a Mac Studio. Both Macs need macOS 13 Ventura or later.
- Thunderbolt 3 or 4 ports on both Macs, and a Thunderbolt 3, Thunderbolt 4 or USB4 cable. A normal USB-C charging cable looks the same but does not work. Look for the lightning symbol on the plug, or "40 Gb/s" on the packaging.
- One license for the Mac you work on: $29, paid once. The iMac that shows the picture does not need a license.
You can download DisplayBridge as a free 7-day trial with all features and without an account. This is a big difference to the conversion kit: you can test whether it works with your Macs and your cable before you pay for anything except the cable. The setup guide explains the two macOS permissions the app asks for when you open it for the first time, and a six-minute video on YouTube shows the complete setup on my own iMac and MacBook.
The hardware solution: converting a 5K iMac into a monitor
In this section I describe how I converted my own 5K iMac, and what I would tell a friend before they order the parts. For instructions that cover every single screw, use iFixit's guides; they are far more detailed than I can be here. iFixit has guides for the 2017 5K iMac with photos for every step: removing the display, the blade SSD guide (which includes removing the logic board), and installing new adhesive strips. Read these guides once before you buy anything. They show you quickly whether you are comfortable doing this job. iFixit's teardown of the first 5K iMac is also useful background; the later models are built in almost the same way.
Which iMacs can be converted into a monitor
The driver boards are made for the 27-inch 5K iMacs from 2014 to 2020. The model number is printed on the underside of the iMac's stand. For comparison, the last column shows which of these iMacs DisplayBridge supports without any conversion.
| iMac | Model number | Conversion kit | DisplayBridge |
|---|---|---|---|
| 27-inch 5K, Late 2014 and Mid 2015 | A1419 | Yes | No (macOS 11 at most, Thunderbolt 2) |
| 27-inch 5K, Late 2015 | A1419 | Yes | No (macOS 12 at most, Thunderbolt 2) |
| 27-inch 5K, 2017 | A1419 | Yes | Yes |
| 27-inch 5K, 2019 | A2115 | Yes | Yes |
| 27-inch 5K, 2020 | A2115 | Yes (the adhesive strips need trimming) | Yes |
| iMac Pro, 2017 | A1862 | Not listed by the seller I used; ask with your panel's part number | Yes |
The 21.5-inch 4K iMacs use a different panel and need a different board; this guide covers the 27-inch 5K models.
Before you order: find out which display panel your iMac has
The driver boards are sold for a specific display panel. The listing I bought from has one version for LM270QQ1 panels and one for LM270QQ2 panels. Both are part numbers from LG, which makes these panels for Apple, and the letters after the number change between model years. The problem: the part number is printed on a sticker on the back of the panel, so you can only read it after you have removed the glass. The model number on the underside of the iMac's stand (A1419 for 2014 to 2017, A2115 for 2019 and 2020) helps to narrow it down, but it does not tell you which panel is inside. This means you either open the iMac once only to read the sticker, or you order the board based on a guess.
How to find and order the right driver board
The boards are sold under several names: 5K driver board, 5K iMac monitor board, LCD controller board or DIY monitor kit. Search on eBay or AliExpress for "5K driver board iMac A1419" or "LM270QQ1 driver board". I used the JRY-W9CUHD-AA1. It has a DisplayPort 1.4 input, an HDMI 2.0 input and a USB-C input that carries video (DisplayPort Alt Mode). It comes with a small button board for the brightness and the on-screen menu, and with the cables for the panel and its backlight. Other boards you will often see are the R1811 and the T18; I haven't used those myself. Check these three things before you buy:
- The panel version: LM270QQ1 or LM270QQ2, matching the sticker on your panel.
- The power adapter: the board needs its own external power adapter (mine is 24 V; other boards use 12 V). Sellers offer the board with or without the adapter. With the adapter, mine cost $111 on sale; without it, $90. Buy the version with the adapter unless you already have a suitable one. Some DIY builds wire the board to the iMac's built-in power supply instead, but that needs real experience with mains electricity.
- A video input for 5K at 60 Hz: this works over DisplayPort 1.4 or USB-C. HDMI 2.0 cannot transmit 5K at 60 Hz.
Most of these boards are shipped from Shenzhen in China, and delivery usually takes two weeks or longer. For the listing I bought from, the estimated delivery time was 11 to 22 days. If the board is wrong or doesn't work, sending it back is complicated: you pay the shipping back to China yourself, and the warranty you get depends on the seller.
If you would rather buy from a repair shop, some sell complete kits with local support. Macfixit in Australia, for example, sells a board with power adapter, USB-C cable, adhesive strips and an opening tool for AUD 449 (checked on 11 October 2026). That is roughly twice what the same parts cost from a marketplace seller.
Parts and tools you need
- The driver board with its 24 V power adapter: $90 to $141, depending on the package and on discounts.
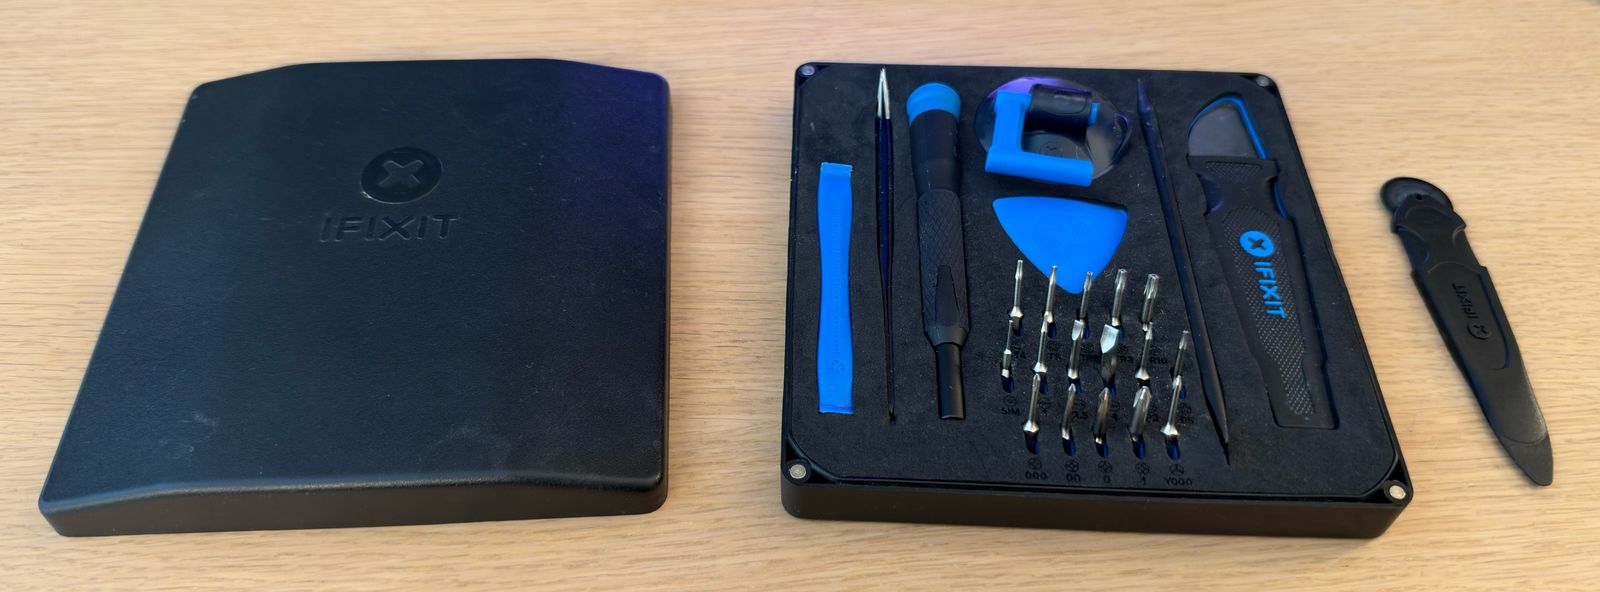
- A screwdriver set with Torx bits. Most screws in the iMac are Torx screws. I used the iFixit Essential Electronics Toolkit ($29.95).
- The iMac opening wheel ($7.99). It looks like a small pizza cutter and cuts through the foam adhesive that holds the glass to the case.
- A new set of adhesive strips ($24.99 at iFixit). The old strips are destroyed when you open the iMac. For the 2020 iMac, the strips have to be trimmed a little.
- Two plastic cards to loosen the remaining adhesive, isopropyl alcohol (90 % or stronger) to clean off the old adhesive, and a soft, flat surface to put the panel on.
The conversion, step by step
- Unplug the iMac and wait before you start. The power supply sits directly behind the glass, and its high-voltage parts are exposed once the glass is off. Its capacitors can still hold an electrical charge after you unplug the iMac. iFixit recommends holding the power button for ten seconds after unplugging. I left my iMac unplugged for a full day before I touched anything, and I would do that again. Never touch the back of the power supply board.
- Cut through the adhesive with the opening wheel. Roll the wheel through the thin gap between the glass and the case, like a pizza cutter, once around the whole display and then a second time. Always push the wheel; if you pull it, the wheel can come out of its handle.
- Lift the panel out of the case. This is the step where the most can go wrong. Use the plastic cards at the top corners to loosen the remaining adhesive, but don't open the gap wider than about 6 mm. Lift the top edge a little and disconnect the two display cables; the data cable is especially fragile. Then tilt the panel up and take it out. The glass and the LCD panel are one heavy, fragile part, and it breaks most easily at this moment: when you twist it too hard, lift it by a corner, or put it down on an uneven surface. Put it face down on a soft, flat surface, and read the part number sticker on its back while you are at it.
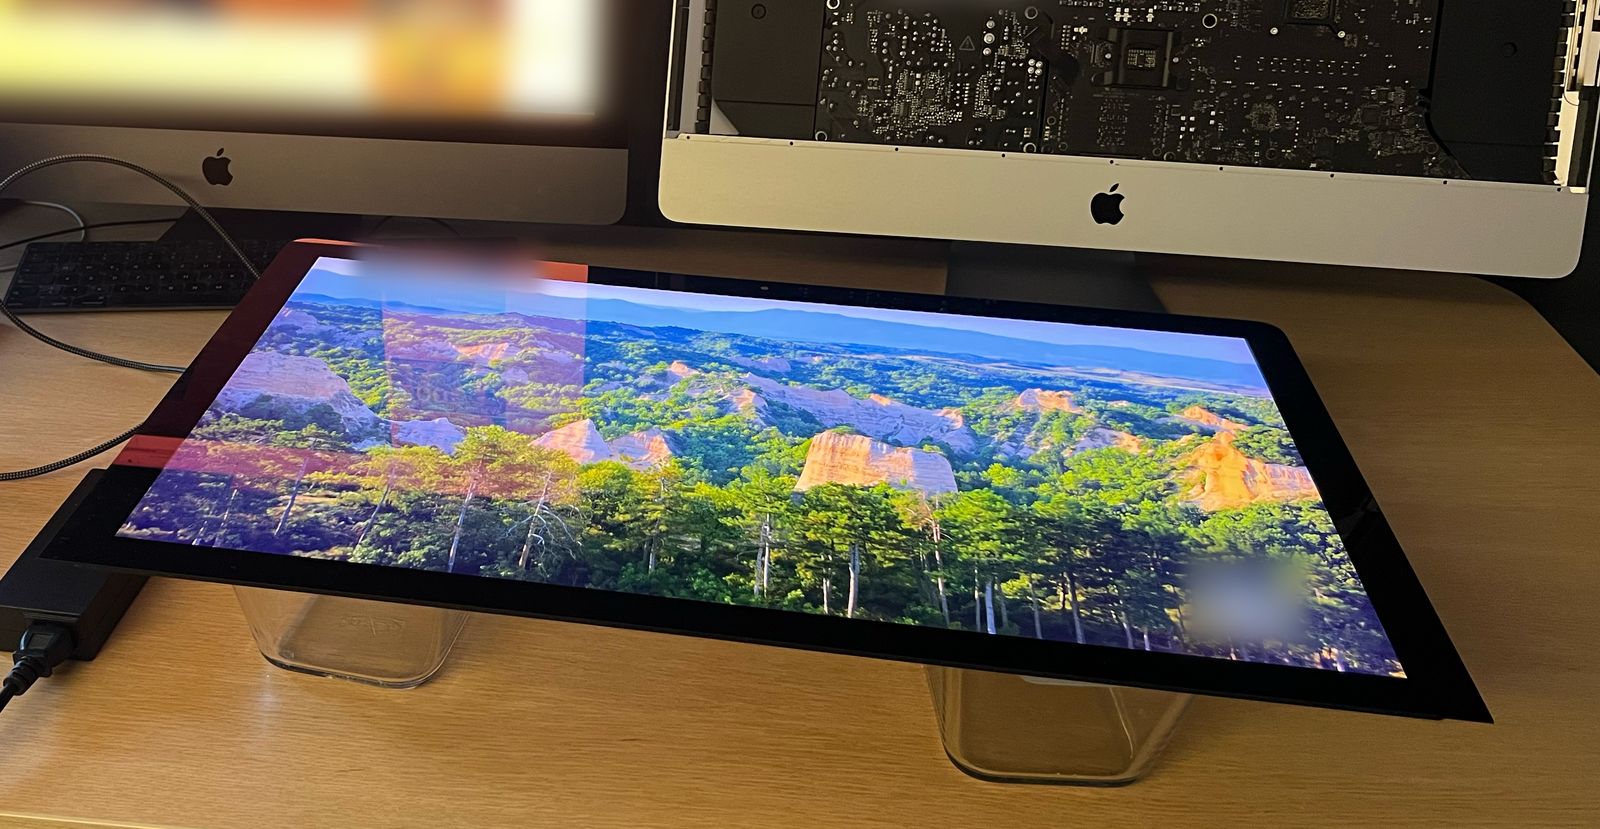
- Test the driver board with the panel first. Before you remove anything else, connect the driver board to the panel, plug in the board's power adapter, connect a computer and check that the picture works. If the board is broken or doesn't match the panel, you can still put the iMac back together and use it as a computer.
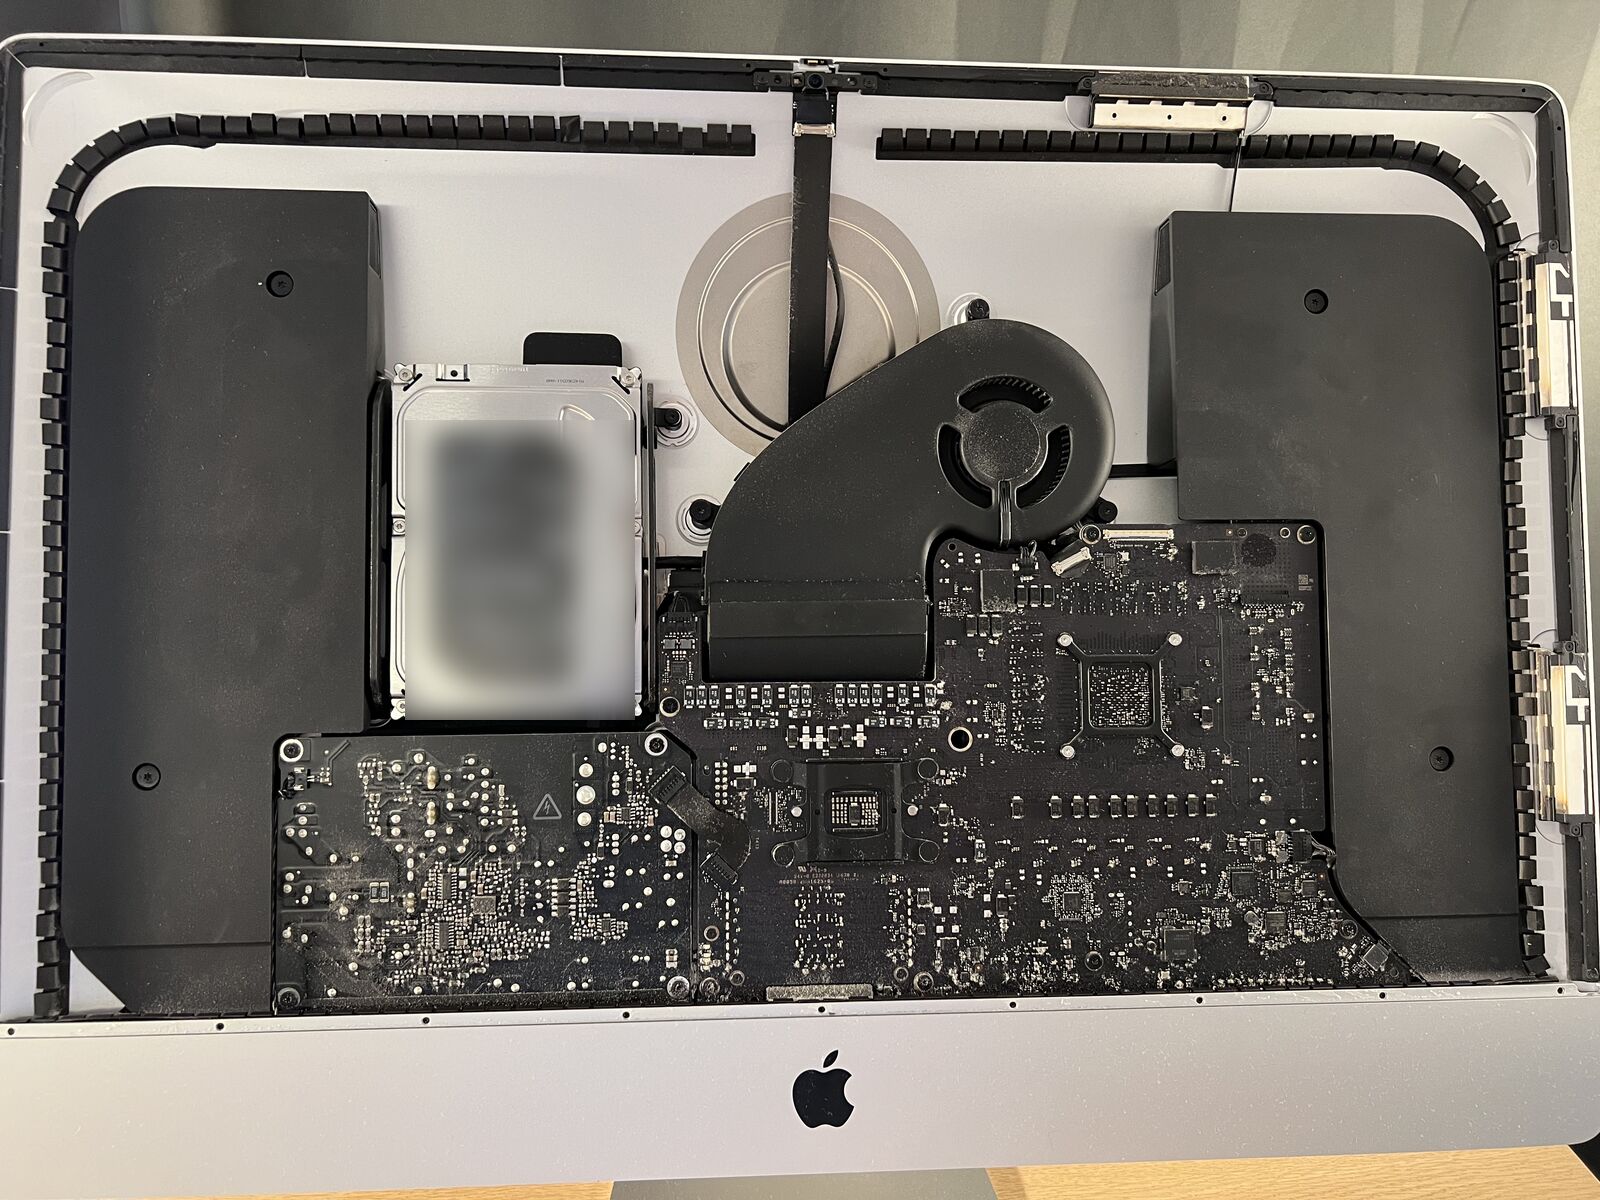
- Remove the logic board. First you remove the parts that are in the way: a support bracket, the hard drive, a speaker and, depending on the model year, more parts. Then you remove a number of Torx screws and disconnect several fragile ribbon cables on the logic board itself. Follow iFixit's guide for your model for this step; it lists every screw. This step takes the longest.
- Mount and connect the driver board. There is no mounting bracket for the board. You can use some of the screw posts of the old logic board, but the holes don't line up, so in my iMac the board mostly just lies loose in the case. People have designed 3D-printable mounts for this, for example this one on MakerWorld. Make sure that nothing on the underside of the board touches the aluminium case, and keep in mind that the board gets quite warm. Connect the panel cable, the backlight cable, the button board and the power, and plan how the video cable and the power cable will come out of the case. Then test the picture again.
- Remove the old adhesive and glue the glass back on. Remove every bit of the old foam adhesive, clean the surfaces with isopropyl alcohol, and apply the new strips in the order shown in iFixit's guide. Put the panel back in place and press it down along the edges. The iMac now works as a 5K monitor.
What stops working after the conversion: speakers, camera and microphone
The iMac's built-in camera and microphones stop working, because they are connected to the logic board you removed. The speakers can't be connected to the driver board directly either. You need an extra speaker adapter for that, which adds to the cost: a widely read conversion guide on Cult of Mac lists a speaker crossover kit for $28, and in that build it didn't work well. Without an adapter, you need separate speakers or headphones. With DisplayBridge, the iMac's speakers simply play your Mac's sound over the Thunderbolt cable.
How long the conversion took me
The work itself took me a bit more than two hours. On top of that, the iMac stayed unplugged for a day before I started, and shipping the board from China takes two weeks or more. If you open the iMac first to read the panel sticker, you also have to either leave the iMac open until the board arrives, or buy a second set of adhesive strips to close it in between.
Can you sell the old iMac parts to cover the cost?
After the conversion you have several parts left over: the logic board with its processor, graphics chip and RAM, the power supply and the speakers. You might expect to sell them and pay for the board that way. In practice, there is almost no demand for the internal parts of an old iMac, so they sell for very little, if at all. What people still want from an old iMac is the screen, and you keep that. For the same reason, a working 5K iMac is worth more as a complete computer than as a set of parts.
When the conversion is the better choice: Windows PC, PS5, Xbox or a 2014/2015 iMac
For some people, the conversion kit is the right solution:
- You want to use the iMac as a monitor for a Windows PC or a game console. 5K iMacs never had Target Display Mode, and DisplayBridge only works between two Macs, so a driver board is the only way to connect a PC, a PlayStation or an Xbox to a 5K iMac by cable. After the conversion, any device with a DisplayPort, USB-C or HDMI output can use it as a normal monitor, including older Macs without Thunderbolt 3.
- Your iMac is a 5K model from 2014 or 2015. These models can't run macOS 13 and only have Thunderbolt 2, so DisplayBridge doesn't support them. The alternative for them is a streaming solution with a compressed picture, such as Luna Display (about $90 for its adapter; see the comparison page). Only the conversion kit drives their panel directly at full 5K.
- No second Mac and no app are needed. After the conversion, you just plug in a cable; no software has to run on either device.
Conclusion: which solution should you choose?
If your iMac is from 2017, 2019 or 2020 and you want to connect a Mac to it, the hardware conversion doesn't make sense in my opinion. It costs four to five times as much as DisplayBridge with a cable, takes more than two hours of work plus weeks of waiting for the parts, risks breaking the display, and the iMac can never be used as a computer again. DisplayBridge does the same job in about five minutes, plays the sound on the iMac's speakers, and you can try it for free for seven days.
The conversion kit is the better choice if you want to connect a Windows PC or a game console, or if your iMac is a 2014 or 2015 model, which DisplayBridge doesn't support.
If you have a Mac and a Thunderbolt cable, the easiest way to decide is to try DisplayBridge first: download the free trial and test it for seven days before you open your iMac.
Questions about this
Is it worth converting a 5K iMac into a monitor?
It depends on what you want to connect. For a Windows PC or a game console, yes: a driver board is the only way to connect them to a 5K iMac by cable, and about 175 to 205 dollars is far less than a new 5K monitor. If the computer you want to connect is a Mac and your iMac is from 2017 or later, I don't think it is worth it: DisplayBridge costs 29 dollars plus a cable, takes about five minutes to set up, and the iMac keeps working as a Mac.
How much does it cost to convert a 5K iMac into a monitor?
About 175 to 205 US dollars in parts and tools, as of October 2026: the driver board with its 24 V power adapter (111 to 141 dollars, depending on discounts), an iFixit screwdriver kit (about 30), the iMac opening wheel (8) and a new set of adhesive strips (25). If you already own the tools, you only need the board and the strips. The software solution, DisplayBridge, costs 29 dollars plus a Thunderbolt cable.
Which iMacs can be converted into a monitor?
The driver boards are made for the 27-inch 5K iMacs from 2014 to 2020, model numbers A1419 and A2115. The model number is printed on the underside of the stand. The iMac Pro (A1862) is not listed by the seller I used, so ask the seller with your panel's part number before ordering. The 21.5-inch 4K iMacs need a different board.
Which driver board fits my iMac?
The board has to match the display panel, not only the iMac model. Sellers offer versions for LG's LM270QQ1 and LM270QQ2 panels. The exact part number is printed on a sticker on the back of the panel, and you can only see it after removing the glass. The model number on the underside of the iMac's stand (A1419 or A2115) helps to narrow it down, but it doesn't tell you which panel is inside.
Can a converted iMac be turned back into a computer?
Only if you kept all the original parts and do the whole job again in reverse: cut the adhesive, swap the boards back, reconnect everything and glue the glass back on with another new set of adhesive strips. In practice, a converted iMac is used as a monitor permanently.
Can I use a 5K iMac as a monitor for a Windows PC, a PS5 or an Xbox?
Only after a hardware conversion. 5K iMacs never had Target Display Mode, and DisplayBridge only works between two Macs, so a driver board is the only way to connect a PC or a game console by cable. The board has DisplayPort, USB-C and HDMI inputs. Full 5K at 60 Hz needs DisplayPort or USB-C; HDMI 2.0 is limited to 4K, which is what game consoles output anyway.
Do the camera and speakers still work after the conversion?
No. The camera and the microphones are connected to the logic board, which is removed during the conversion. The speakers need an extra speaker adapter to work with the driver board; without one, you need separate speakers or headphones.
Can I use DisplayBridge with a 2014 or 2015 5K iMac?
Not at the moment. DisplayBridge needs macOS 13 Ventura or later and Thunderbolt 3 on both Macs. The 2014 and 2015 5K iMacs can only run up to macOS 11 and 12, and they have Thunderbolt 2. For these two model years, the options are a conversion board, which drives the panel directly at full 5K, or a streaming solution with a compressed picture such as Luna Display.
Is it dangerous to open an iMac?
The power supply is the dangerous part. Once the glass is removed, its high-voltage side is exposed, and its capacitors can stay charged after you unplug the iMac. iFixit's guides recommend unplugging the iMac and holding the power button for ten seconds; I left mine unplugged for a full day before touching anything. The other risk is damage to the iMac itself: the glass panel can crack while you lift it out.
Do I have to open my iMac to use DisplayBridge?
No. DisplayBridge is an app. The iMac stays closed and is not modified in any way, and it works as a normal Mac again as soon as you disconnect. The only hardware you need is a Thunderbolt cable.